Thursday, May 28, 2009

Kapes' Kitchen: Chile Relleno (Much tastier fried!)

Lately, I have been watching my figure... well, expand. With all the tastiness in Austin, and MikeDub's newfound talent for frying up his own Chinese food, it is difficult to maintain any sort of waistline. Before the realization that one of my belts needed a new hole, I had picked up a few poblano peppers to cook up some chile relleno. I was saddened as I noticed them starting to wilt, but didn't have the heart to fry up my dinner in oil. That's when a friend suggested baking them... Looking online, I found a recipe for a relleno casserole! The original recipe is here, however I modified the hell out of it.

I have my own thing going on with the chile relleno, and I've developed my own stuffing. And just to notify y'all that this little white girl has some cred in the area of Mexican cooking, the first time I prepared this dish (fried) my Mexican student told me that it tasted like her mom's. SO THERE! Here I present to you the baked casserole I tried tonight (with pictures) and the fried recipe, just because it's soooo yummy! Happy cooking...

THE INGREDIENTS:
3 Poblano Peppers
1/3 lb. Ground Beef
Red Onion
1 Carrot
1 tsp. Chili powder
Cheddar and/or Jack Cheese (I once found a block at HEB where they were premixed. Soft and crumbly and easy to work with--I believe the brand was Kraft)
4 eggs
Flour
Salt
Pepper
1 Tbsp. Butter (for the baked dish)
Oil for frying (for the fried dish)

There are a few steps to making successful relleno. For both recipes, many of them are the same. The "to do list" includes (1) pepper prep (2) stuffing prep (3) batter (4) baking or frying

PEPPER PREP
Roast the peppers. Place them under the broiler until the skins blister and blacken, rotating so that all sides are blistered. Remove from oven and wrap the peppers in foil. Leave them in the foil to "self-steam" until they're cool enough to handle. Once cooled, slit the pepper down the side and remove most of the seeds. If I forget to bring home latex gloves from work, I wrap my hand in a plastic sandwich bag to remove them. Trust me, these little seeds are spicy! Protect your hands!


STUFFING PREP
I like beef in my relleno. This is not the traditional way to do it, but I love it. Combine the beef with diced red onion, thinly sliced carrot (I prep these with the peeler), chili powder, salt, and pepper. Brown the meat on medium heat. Drain. You may choose to mix the cheese with the meat at this point for more even distribution. Stuff the peppers; be certain that they will close if you intend to fry them.


BATTER PREP
Separate the egg yolks from the whites. Beat the whites until they are fluffy and full of air (see picture). I use a wire wisk, but imagine a hand mixer would revolutionize this process for me. Once the whites are light and fluffy, mix the yolks back into the whites in small portions, while continuing to beating vigorously. I only reintroduce about half of the yolks to try to be healthy.


THE FRIED DISH
Preheat the oil on medium-high heat. Dust the peppers with flour on both sides, and dip generously in the egg mixture. Be certain to get the fluffy mixture into the slit; it will help it to seal back up. Using a spoon (so you don't burn yourself), transfer the pepper into the heated oil. I like to begin slit-side down; I think it seals them up better. Fry until the egg just begins to brown. Rotate the pepper and fry the other side. Transfer to a paper towel to drain and cool.

THE BAKED DISH
Grease (I used Pam) a shallow ~8 x 8 baking dish and place the peppers in the dish. Add the butter (melted, but not hot) to your egg mixture and pour it over the relleno. Bake for 18 min on 375 º or until egg mixture sets. I did not do this, and I'm not sure if it would ruin the fluffyness, but I think the egg mixture would taste better with some salt added to it.

Clay Pit (1601 Guadalupe St.)


This may look like an ordinary glass of prosecco, however, I assure you, it is far from ordinary. I actually have no idea what brand of prosecco they served me in this glass at the Clay Pit, however that is completely inconsequential. What makes this prosecco so special is the fact that, just prior to pouring it, they put about a tablespoon of their ginger and chili infused vodka in the glass.

Note for Vodka haters: You will not notice it. I convinced Madam Rawr, who despises vodka, to try this drink with my incessant raving. She ordered her own after one sip.

All of the infused drinks at the Clay Pit are phenomenal. MikeDub once ordered the infused martini. Although delightful to sip, it was just a bit too spicy for me. I would not have been able to drink an entire glass, which is good for him, seeing as his martini did not "disappear" when he took a trip to the restroom.

Ok, back to the food. Now, I've heard some people complain that the Clay Pit is not "authentic enough" Indian food. Never having been to India, I am not qualified to comment on this. The thing that I can say, is that Clay Pit has its own thing going on, and that thing is good.

There is a decent lunch buffet, generally with four entree choices, one of which is always the tandoori chicken. They serve complementary naan with lunch, which is a nice feature. Having eaten at many Indian buffets, I can say I am not overly impressed with the Clay Pit's, however it doesn't stop me from eating the buffet once every couple of months or so.

Since I only blog about restaurants I think are worth trying, I don't wish to sit here and bitch about the buffet being average. I want to tell you what keeps me coming back (aside from infused drinks)! First of all, the curry crab cakes are phenomenal. I try crab cakes everywhere, and these are my favorite in Austin. Although they are bready, and I do prefer lump crabmeat, the spices make this crab cake exquisite. On the evening that is pictured here, I enjoyed the lamb korma. The lamb is always so tender, and no matter which of the signatures sauces you choose to put on it, it is exquisite. I particularly enjoy the fact that you may choose the level of spiciness of your dish: mild, medium, hot, or desi. Madam Rawr had jeera saag paneer, which was good, but not exquisite in my opinion. I relish the Khuroos-E-Tursh, spinach and vegetable stuffed chicken medallions in a in a cashew-almond cream sauce. The Lamb Roganjosh is also one of my all-time favorites at the Clay Pit.


If you're looking for romance, there is a unique basement dining area with tables of two for that special occasion. The basement is the remnants of a tunnel that led from this historic Austin building that was once a general store (built ca. 1880) to the brothel next door. You can read about the historic, and supposedly haunted Bertram building.

And visit the Clay Pit's website here.

Saturday, May 16, 2009

Kapes' Kitchen: Ultimate Salmon Tacos

Friday night, MikeDub and I were called in to cook for a couple of friends. One of our nearest and dearest is 9 months pregnant, and needed a break from culinary duties. We relished this opportunity; this couple has an amazing kitchen, and let me tell you, standing on opposite sides of an island sure beats wondering if you're going to lose a limb when your partner walks through the kitchen with a knife.

I called ahead, a good tip for when you're cooking for someone new, or someone who may have special needs. I inquired if my pregnant friend was OK with salmon. Due to the mercury content of fish in our increasingly toxic environment, consumption should be limited. During pregnancy, this is especially important. Well, salmon just happens to be our friend's favorite fish, and it is the one maritime friend that she will make the exception for (fortunately, it is also a "lower mercury" choice).

I've been working to perfect this dish for six months, since the night I dreamed it up based on some random items in the fridge.  I think it is close to perfect, but you should leave suggestions if you come up with something better, or have a favorite twist on it.  The "secret" of this dish is developing the toppings to suit your taste. Nearly all of the prep can be done ahead of time, making this an outstanding choice for a dinner party dish. Just prior to serving, the fish should be prepared, along with as many tortillas as needed. Remember, making tortillas for a few guests does take a bit of time. I recommend starting the tortillas a few minutes prior to cooking the fish. Having two pans for tortillas isn't a bad idea if you have a full house.

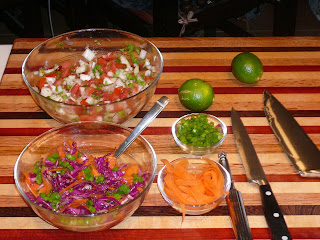
All of the crucial ingredients are pictured here, except for the avocado (dad-to-be had to grab those on his trip home):


ULTIMATE SALMON FISH TACOS

Slaw
1/4 of a purple cabbage, shaved thin
2 large carrots, shaved thinly with a peeler
2 tablespoons of extra virgin olive oil
2 tablespoons of balsamic vinegar
2 tablespoons of lime juice
pepper to taste
2 scallions (green onions), chopped

Combine everything but the scallions. Using a spoon, stir the mixture until the cabbage is coated with the oil and vinegar. When preparing the slaw ahead of time, stir well just before serving. I like to top with the scallions last minute; it makes it look fancy :)  May be prepared the night before.

Pico De Gallo
2 roma tomatoes, diced
1 small white onion, diced
1 jalapeño pepper. diced finely
1 bunch of cilantro, stems removed, chopped finely
juice of 1 lime
salt

Combine all ingredients and stir well.

Roasted Red Pepper Salsa
One jar of your favorite salsa (HEB roasted salsa is the best!
One roasted red pepper (you can buy these in a jar, or make your own)

I just throw everything in a blender and hit pulse a few times.  

Fixin's
one large avocado, sliced and sprinkled with lime juice (mandatory, unless you are allergic to avocado)
sour cream (optional)
hot peppers, or other spicy stuff
whatever else you like to put on tacos...


ALL OF THE ABOVE MAY BE PREPARED AHEAD OF TIME

Fish and Tortillas
1 to 1-1/2 lbs. of super-fresh, wild caught salmon: Just under a pound serves two with leftovers, and just over a pound served five of us (if you include baby-on-the-way)
olive oil for brushing, salt and pepper
raw flour tortillas (HEB shoppers: get Guerrero tortillas [pictured], which can be found in the bread aisle. You should not be using anything else for flour tortillas.)

The salmon can be cooked either on the stove or in the oven.  When cooking for just MikeDub and I, I like to do stove top.  In this TX heat, it's much more convenient not to turn on the oven. 

Stove Top: Place fish skin-side down in a saucepan and add just enough water to steam. Add salt and pepper to taste.  Top the salmon with limes, cilantro, onions, etc. (Personally, I like the flavor cilantro gives the fish–add this during the final couple minutes of cooking so that it doesn't wilt.)  Heat the water to boiling on medium high heat.  Simmer, covered, on medium to medium–low heat for about 10-15 minutes.  When the white lines in the fish just start to run, the fish should be done.  It should be flaky in the center; check with a fork.

Oven: Preheat oven to 400 ºF.  Place salmon skin-side down on the baking sheet (for easier cleaning cover with foil).  Brush the fish lightly with oil, and then top with vegetables or spices (see above).  Check the fish after 10 min of cooking (just over a pound of fish took 15 minutes).  Check for doneness as described above.  


Thursday, May 14, 2009

Catfish Beignets! (A review of Z' Tejas)


Apparently, Z' Tejas is not just a Tejas thing... There are locations in California, Utah, Arizona, and Washington as well. This was brought to my attention recently, as my best friend (and fellow Z' aficionado) got me a gift certificate online and it came to me from Phoenix. I recommend the gift certificate highly, as you can send it remotely (my friend sent mine from North Carolina), and it even comes with a personalized message! Very nice.

Z' Tejas is an excellent chain, and I've been addicted to this restaurant since the first time I visited. And it's all because of the catfish beignets.

My first Z' experience was at the Arboretum, and to be quite frank, I didn't like my dinner that night. I had ordered the wild mushroom enchiladas.  Come to find out, this is the only item on the menu that I've tried that I actually dislike.  (Proof that you should never write off a place based on a single tasting.) The complementary cornbread that they serve was quite excellent, however, and I was sold on the beignet appetizer. Cornmeal-crusted bits of flaky catfish served with a chipotle mayo. *Eyes roll into back of head.*

This past Saturday, I got all of my favorites, including a $3.50 brunch special mimosa... You've gotta live it up when lunch is on someone else's dime! As a tribute to my best friend, I ate his favorite dish: the smoked chicken chile relleno. One of my favorite relleno's of all time, this chile is packed with savory chicken, pecans, apricots, and raisins. I was skeptical when I read the description for the first time, but the dried fruits make this dish! MikeDub had the chicken fried rib eye for lunch, which I stole generous portions of while he was in the restroom. I guess the secret's out now...


The thing about Z' is that pretty much everything they make they make well. Whether it's a traditional American or Mexican dish, it has it's own Z' flair, and that flair is what keeps me coming back: some of the dishes here I just can't make better at home.

Lunch included one beer, one mimosa, appetizer, relleno, and steak for $39.60. This number is significant, as the gift certificate was for $40. Talk about making the most of things! 

The two locations I have visited are the West 6th St. location, and the Arboretum (Visit the sites by clicking the hot links.) The downtown location definitely has that "Austin-y" feel to it, while the one up north seems a little more elegant. Both have incredibly nice outdoor seating, and the Arboretum patio has a hill country view. Both spots come highly recommended by me!

I'm providing a list of my top 5 dishes (in order) for your dining pleasure. Enjoy!

Kapes' must try list
1. Grilled Chipotle Beef Tenderloin (I love to add the crab meat, although MikeDub doesn't believe it adds much.)
2. Catfish Beignets
3. Smoked Chicken Chile Relleno
4. Chicken, Artichoke & Mushroom Stack (so incredibly good; better than the description can express)
5. Grilled Miso Salmon

Kapes' (Momma's) Kitchen: Strawberries n' Cream


My mother tells a tale of being 8 months pregnant with me, picking strawberries in the field, and eating as many as she picked. It might be an exaggeration, but given my obsession with this fruit, it might not be too far off. This recipe (which is really more of a serving suggestion than a true recipe) truly surprised me, as I knew not my entire childhood what the "cream" component was.

Whole Strawberries
Sour Cream
Brown Sugar

Dip the strawberries in sour cream, and then brown sugar.

Don't be turned off by the sour cream, folks! The blending of flavors in this recipe is so outstanding that you will never know it's sour cream if your mother doesn't tell you...

Sunday, May 10, 2009

Cobra Wine: Probably Not Very Good

I figured that a post on such an excellent wine as below deserved to be followed up by something truly disturbing.

snke wine 3

A close friend of mine loves to tell a story about how he once drank cobra sake in Thailand, or something to that effect. A little research into his story has revealed an amazing world of reptile-infused spirits that will surely revolt you in ways you never thought possible.

The practice of placing deadly snakes in bottles of rice wine is thought to have originated in Vietnam, and has since spread throughout South Asia. The wine is typically drunk in small shots, and is believed to have medicinal qualities.

You can't get the stuff here in America, mostly because many of the snakes you see here are endangered species, and their import is illegal in the U.S.

snake wine 1

The idea is to let their venom dissolve into the wine, providing a thrilling additive to what was surely a much more boring imbibe of cheap rice wine. But don't believe the hype. The venom loses its effects as it is absorbed. The ethanol in the wine denatures and unfolds the proteins within the poison, rendering it harmless.

If you've ever smelled a large snake, you may be aware that they emit an odd odor, known as musk. This musk comes from glands that are located beneath the snakes scales, and probably plays a roll in mating or territory marking. I'm fairly certain that this musk would also be absorbed into the wine, making it taste like death. Gross, snakey death.

According to my friend Steve, this is the most horrifying stuff you could possibly ever drink.

I don't think we'll be serving this at the bar anytime soon.

Sweet Baby Blue

This is the first of what will be many, many posts on excellent wines that I happen to come across.

wine,label,bottle,baby ble

I happen to be in an excellent position to taste and try dozens of new wines every week, as the sales reps come through the wine bar that I help to manage, Cork and Co. (located on 3rd and Congress Ave, downtown Austin, TX). But every now and them something so fantastic comes along that I can't help but get excited about it.

Blue Rock Vineyards is located in Alexander Valley, CA, right next door to the legendary Silver Oak Vineyards. And it's location befits the quality of what they put in their bottles, believe me. Consisting of about 100 acres planted mostly with Bordeaux varietals (Cabernet Sauvignon, Cabernet Franc, Malbec, Merlot, Petite Verdot) and a small hillside of Syrah, this is a small, and special place that produces remarkably complex and thrilling wines.

Blue Rock gets its name from the blue shale pebbles and boulders that dot the vineyard, providing it with an utterly unique landscape that is appropriately difficult for the vines, producing more complex and fine wine. By managing their yield, and even removing a majority of the grapes from the vine before harvest (as opposed to using low quality grapes in a lower-end wine), they really have acheived their stated goal, which is to produce higher quality wine with each successive vintage.

While it is not at all unusual for me to taste a wine in the $80-100 range that is phenomenal, it is a much rarer thing for a less expensive bottle to have the finesse and elegance that is usually associated with higher-end labels. The Baby Blue Cabernet, Blue Rock's "entry level" bottle achieves exactly that.

This wine is gorgeous in the glass, a striking rich crimson, with strong aromatics and complexity on the nose. Fruit, acid and tannin are balanced perfectly here, and the wine is smooth and rich in your mouth, with such a long lasting and elegant finish that I find my eyes rolling back into my head with each sip. I seriously could hold this wine in my mouth for ages, and just let it absorb into my head. That's how good it is.

This cab is not as big and bold as many, but that should not be mistaken as a flaw. The feminine elegance of a perfectly balanced cabernet can be just as effective as a super-rich, hit-you-over-the-head, smoky/oaky glass can. And it can be found here in spades. This wine is drop-dead sexy.

The more expensive bottles from Blue Rock, such as their Blue Rock Cab, are undeniably excellent, and better suited to ageing with more robust tannins and oak, but this Baby Blue has it all, character, complexity, elegance and value.

While I'm not sure that any major retailers are carrying it, you can most certainly taste it at Cork and Co, where it sells for $42 for the bottle, and will soon be served by the glass. Come on by and I'll pour you a nice one.

Saturday, May 9, 2009

Pad Thai

All in all, there's a dozen or more thai restaurants in Austin, with more popping up all the time. They are even installing a joint called "Pad Thai" in the new Mueller development. And appropriately so. Pad Thai is usually the most popular dish at any given thai place, and is generally the standard by which a restaurant is judged, along with the Tom Kha lemongrass soup.

I've noticed a lot of variation from the various places I've eaten pad thai, but frankly none of them really work for me the way my dad's did.  There always seems to be some small element lacking in restaurant fare.

So here's my dad's incredible Pad Thai recipe. Simple, and effective are the name of the game, so don't stress this one. It's quick and easy.

There are 5 key elements to good Pad Thai. The Tofu, The Fry, the Sauce, the Noodles and the Garnish. 

The Tofu
one package (12-16 oz.) of tofu, with the water pressed out, and cut it into bite sized pieces. 
Veggie oil for frying

The Fry:
a few tablespoons of veggie oil for frying
5 cloves of garlic, minced
3 green onions (scallions), the bottom parts chopped super fine, save the green tops for garnish
5 - 8 small dried shrimp, chopped into dust

The Sauce:
1/4 cup fish sauce (you can sub half soy sauce if you want, for a less fishy dish)
1/4 cup brown sugar
2 tablespoons tamarind concentrate (look in the Asian aisle of your local specialty food store)
1 tablespoon paprika
juice of one lime

The Noodles
These should be rice noodles, preferably the nice fat ones. Some prefer the skinny ones, but not me. You should use about 2/3 of a package. 

The Garnish
a big mess of bean sprouts
the tops of the green onions
some chopped up peanuts
some basil leaves

Prep all this stuff up in advance.  Once you start cooking, this moves really fast.

I like to fry the tofu while I do the rest of the prep, this condenses this whole affair into about a half-hour start to finish. Fry the tofu in veggie oil until it is crispy and firm. Remove from the oil and let sit on a paper towel to absorb excess oil. Discard the oil.

Start up by boiling a pot of water deep enough to hold all the noodles. Once it reaches a boil, turn off the heat and dump the noodles in. Stir them well, so that not many stick together (though this is an inevitability). Any noodles that do not separate should be discarded. 
The noodles should sit for about 8 to 10 minutes in the not-quite-boiling water.

 Towards the end of this, heat your Fry oil and throw all of the Fry into a nice, wide pan. Fry it on medium heat until the garlic and onions become aromatic (2-3 minutes).

Drain the noodles, which should be just barely too firm to eat at this point, and throw them directly into the Fry pan. Toss the noodles until they are well coated with the oil from the Fry. 

Add the Sauce and the Tofu, stirring constantly. The liquid should reduce away, and you will have a reddish-brown noodle concoction. Fry for about 3 to 5 minutes.  It should be smelling pretty awesome by now.

Taste your noodles. If they are not soft enough to eat, simply add a bit of water and cover the dish on the stove for a minute or two.  The steam will soften up the noodles. Don't let them get too soft, or your dish is a mess of goo!

Congrats! Your pad thai is done! You can either throw the Garnish in with noodles and fry it for a bit, or serve it raw on the side.  I like the bean sprouts added in, and the rest sprinkled on top.

Plate and enjoy, this recipe will serve 4 in a pinch, though a salad or side dish is recommended.


Wednesday, May 6, 2009

It's a trailer park revolution!


Ahhh, Sunday... A leisurely day for many, but for MikeDub and I, it's just another day at the rat race. We were trying to get a quick taco on our respective journeys into work. I was craving Maria's Taco Express, but as we (and four other vehicles) were trying to maneuver out of the completely full alcove of a parking lot behind Maria's, I knew this wasn't going to happen.

Our journey continued to Oltorf St, as we thought we had just enough time to enjoy a taco and oaxacan coffee at Curra's Grill. That's when the déjà vu set in... Another journey in and out of a full parking lot. My stomach was angry and my head was about to follow suit. I'd resigned myself to a frozen Amy's dinner that I had in the fridge at work, and we headed north on South Congress.

South Congress St., or Soco as the locals call it, is a charming strip in South Austin. Full of knick-knack stores, art shops, and vintage Austin clubs, it is an eclectic part of town. As we continued on our northbound journey, observing the funkiness around us, we came upon... a line of trailers!

Right around Monroe St., a parking lot had been lined with a bunch of trailers, all serving various goodies. This is not a new concept for Austin; many Austinites are familiar with the South First St. "Trailer Park Eatery," which features none other than the legendary Torchy's Tacos (which will be reviewed in due course). Well, this spot had at least five trailers, making it the largest selection of restaurant trailers this town has seen yet! And it wasn't even crowded!

We turned the car around and went to have a taste. Parking was terrific... It's a PARKING LOT, folks! I was delighted to find a crepe stand; crepes are a treat I don't often have time to prepare. The 4+ hours that the batter needs to set requires a bit of planning ahead, and it's always morning time when I feel the crepe urge; never the night before.

I regret to inform you that I was unable to take photos of the crepes; they were so damn good we dug right in without a thought of sharing them with the blog-reading world. I had a florentine crepe. Packed full with chicken, mushroom, and spinach, this $7 treat was worth every single penny. MikeDub enjoyed the turkey gruyere crepe, which to our delight came topped with an over-medium egg! We traded halfway through, and I'm still not sure which was my favorite. We also stopped by the Armadillo coffee trailer. We had hot coffee, and it was delicious, though the woman boasted that her iced "sun coffee" that steeps over 24 hours is the cup of choice. Next time.

If you're looking to avoid the Sunday crowd, sit at a picnic table and have an awesome bite, the trailer park is the place to go. I recommend hitting the trailer park while enjoying a stroll up SoCo, if you have the time. C'mon, it's Sunday, after all...

Tuesday, May 5, 2009

Central Texas Grows

Mmmm.... delicious, fresh herbs. Nothing makes your meal more delicious or beautiful than these little green fellas. But so expensive at the grocery store!
Everywhere I go, I see tiny plastic packets of miniscule amounts of fresh herbs selling at outrageous prices. I don't care how good it is, there is no such thing as basil worth more per pound than filet mignon. These herb farmers may be the smartest people in the world. They're sitting in their mansions built from easy to grow herbs laughing at us poor, dumb folks that buy them. Well, no more! I will deftly walk you through how to cultivate your own easy to grow herbs, and you can liberate yourself from your herb-farming overlords. 

Rosemary
Rosemary Pictures, Images and Photos
This is, by far, the easiest plant in the world to grow. I have pulled rosemary plants from the dirt, thrown them in my trunk, planted them two days later in soil that could only be described as pulverized concrete, and had them grow to a massive size with little to no effort whatsoever. (Note: I am not advocating rosemary theft.) They do seem to do better with morning sun, though, and I can't recommend them for container gardening, despite that several people I know seem to do fine with rosemary in pots.  I'd recommend buying a small living plant and sticking it in the ground where it gets plenty of sun. They need barely any water, though it helps, and will grow in almost any conditions. Once it gets big enough, there's no way to run out of this delicious herb. It goes great on potatoes, as well as meat of all kinds.

Oregano

The flavor and smell of fresh oregano is much, much better than the dried version. Fresh oregano breathes life into tomato sauces and italian foods in general, and it is super-easy to grow. 
I grew my oregano from seed, which was easy enough, though it takes longer. Lots of sun, lots of water does the trick with this herb, and if you take care of it, it will completely take over your garden, bushing out into a massive plant. 
Neat trick: If you grow one for a season, then half bury the bush in fresh dirt, the bush will firm up, grow taller and wider and become more established.

Basil
Photobucket
The big daddy of all herbs, basil is a crucial element in everything that is delicious. Pesto, caprese, salads, all of it. 
Unfortunately, it's also a bit trickier to grow. Basil likes lots of sun, lots of water, and lots of room. These things can be harder to come by, particularly if you're growing in a container. But a nice big pot will yield a bushy basil plant if you treat it right. 
Sadly, the most important lesson I have learned growing basil is that you simply can't eat off of it. Stems that have leaves plucked off will turn to harder wood, and will grow no more delicious leaves.  So leave the damn thing alone for a while. Once it gets big, don't pluck leaves off, but cut entire stems from the base. This will encourage further growth.
Also, as pretty as the flowers are, cut them off at the first sign. If they blossom, this is a sign to the plant that it has finished its reproductive cycle, and that it's time to die. Chop those lovely flowers off and use them as garnish on your plate. This will ensure that your basil will continue to produce all season.
  
Bon Gardening!
-MikeDub